Local ranking map on Google Maps
How Miraqo's local ranking map works — creating locations, 3×3/5×5/7×7 grid, keyword selector, Google map with coloured circles per position, historical trend table, pausing locations, immediate initial scan and a rescan every 7 days, change emails, credit budget per plan and add-on.
The Local map measures where your site ranks on Google Maps for each keyword, point by point around a location. It’s designed for businesses with a local catchment area (shops, practices, restaurants, tradespeople) and for franchises with multiple locations under the same brand.
In local SEO, Google position changes within a few metres: in the city centre you might be #1 and in the suburbs #20 for the same query. The geographic grid lets you see this at a glance.
Where to find it
From the project → in the sidebar in the Local SEO group:
- Local map — the main page (this guide)
- Google Listing — the project’s Google Business Profile (see Google Listing)
- Citations — your presence on directories (see Citations)
Adding a location
From the + Add location button in the top right:
- Location name — internal label (e.g. “London Central Branch”). Required.
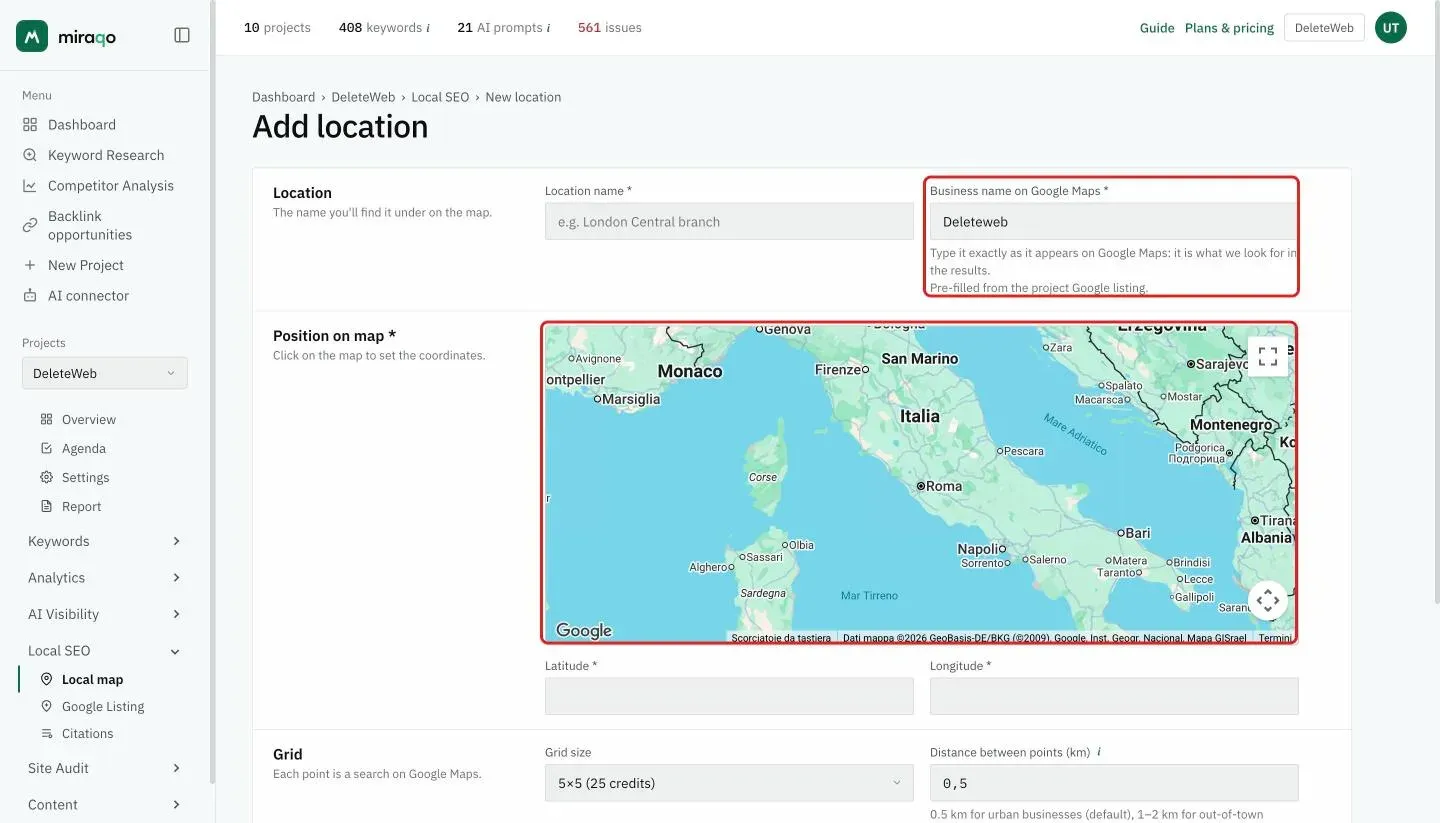
- Business name on Google Maps — the exact name your business appears with on Google Maps (e.g. “Mario’s Pizza”). It’s required: it’s the string we look for in the results. If you’ve connected the project’s Google Listing the field is pre-filled, and leaving it empty pulls the name from there.
- Select position on the map — click directly on the map to set the grid’s centre. Lat/Lng fill in automatically (and are editable by hand for decimal precision).
- Grid size — 3×3 (9 points), 5×5 (25 points) or 7×7 (49 points). Available sizes depend on the plan (see below).
- Distance between points (km) — how far apart two adjacent grid cells are, not the overall radius. Default 0.5 km: a 3×3 at 0.5 km covers roughly 1 km across, a 5×5 roughly 2 km. Use 0.5 km for an urban business, 1–2 km for out-of-town coverage. The more spread out the points, the easier it is to fall outside the radius where Google considers you relevant — and at that point you don’t show up at all, rather than showing up lower.
- Keywords to track (optional) — one per line. You can add them later from the edit page. As soon as added (here or later) they’re scanned immediately, so you see the first data without waiting for the next automatic update.
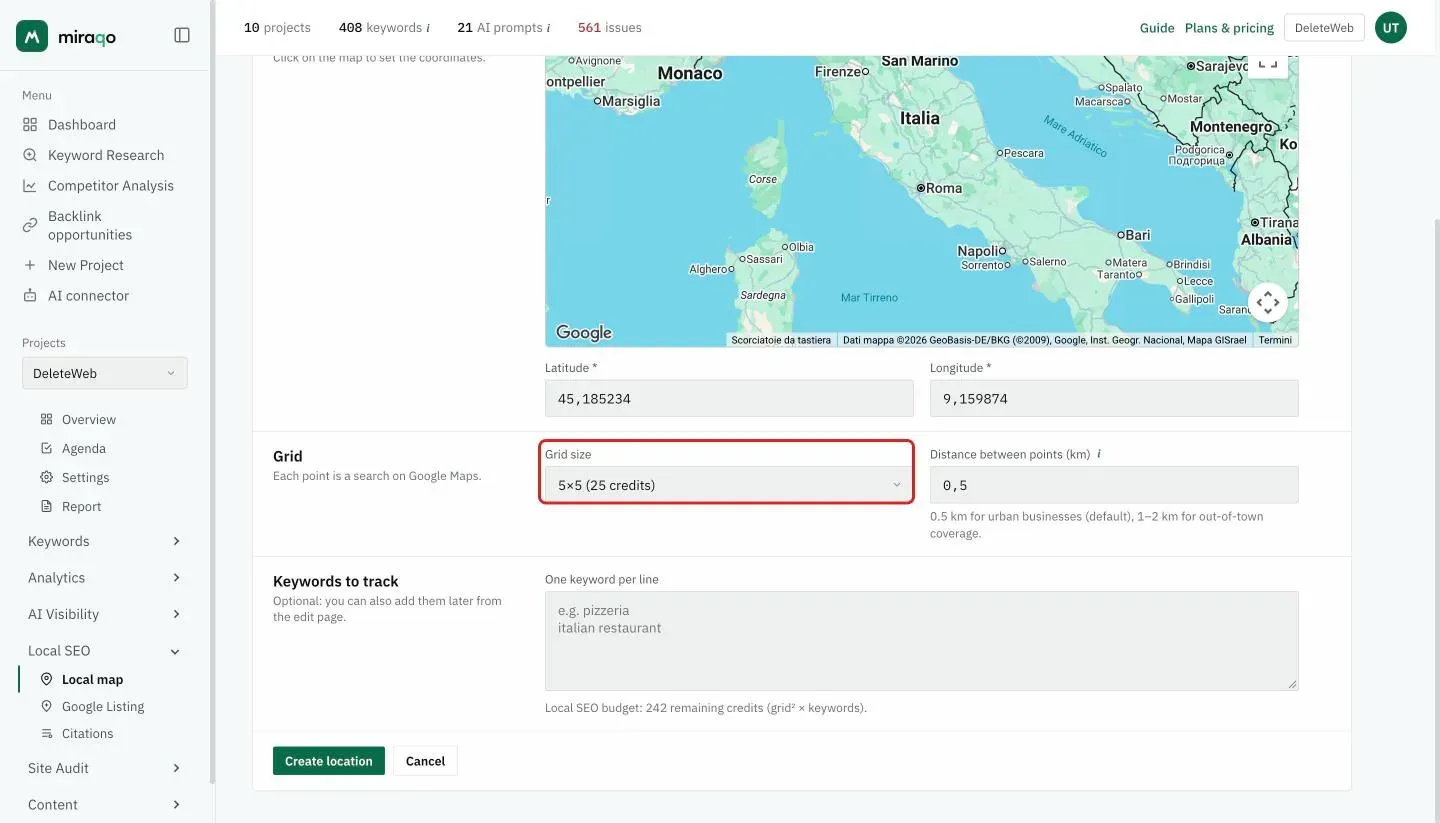
Credit cost. Each keyword associated with a G×G grid consumes G² credits from your Local SEO budget (e.g. one keyword on a 5×5 grid = 25 credits). A grid without keywords consumes nothing.
Keywords should not contain the geographic modifier. Write
pizza, notpizza london— the geolocation is already provided by the grid. Adding the city name works but measures a less realistic query.
The local ranking map page
Header and keyword selector
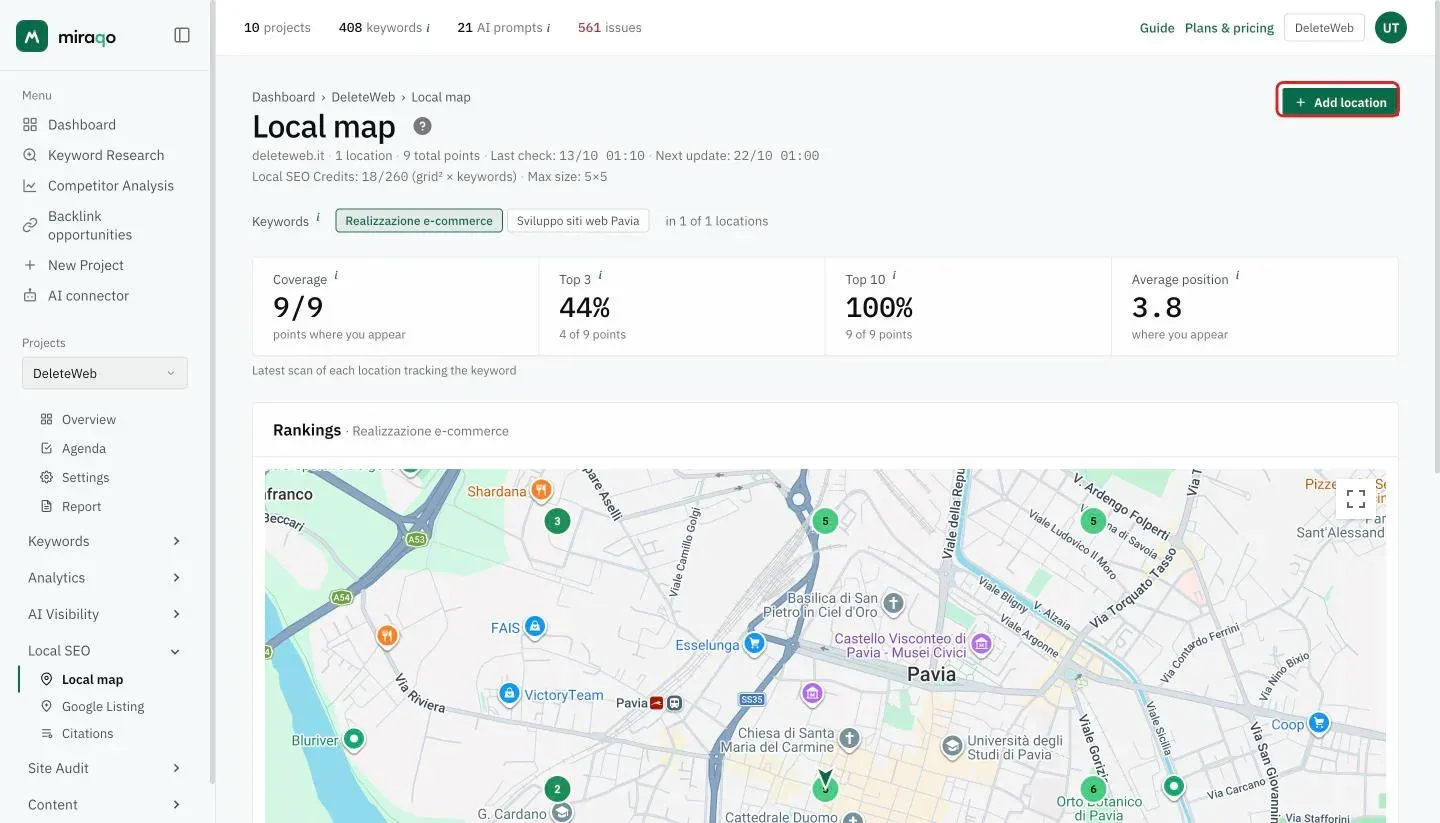
Below the title you’ll find the number of locations and total points, the last check, the date of the next update and the Local SEO credits used out of the total, with the plan’s maximum grid size.
If you track more than one keyword, the Keywords row has a button for each, with the number of locations tracking it next to it. Clicking it, the map updates showing positions for that keyword on all locations that track it.
The 4 stats per selected keyword
- Coverage — at how many points of the locations tracking the keyword the site appears on Google Maps (within the top 100), out of all points
- Top 3 — the share of those points where the site is in the top 3, with the detail “N of T points”
- Top 10 — same for the top 10
- Average position — average of the positions at the points where you appear (lower = better); Coverage tells you where you don’t appear
All four figures use the latest scan of each location, without mixing rounds from different dates: they are the same as in the PDF report and the “Local SEO changes” email.
The map
Below the stats, the Rankings card with a Google map:
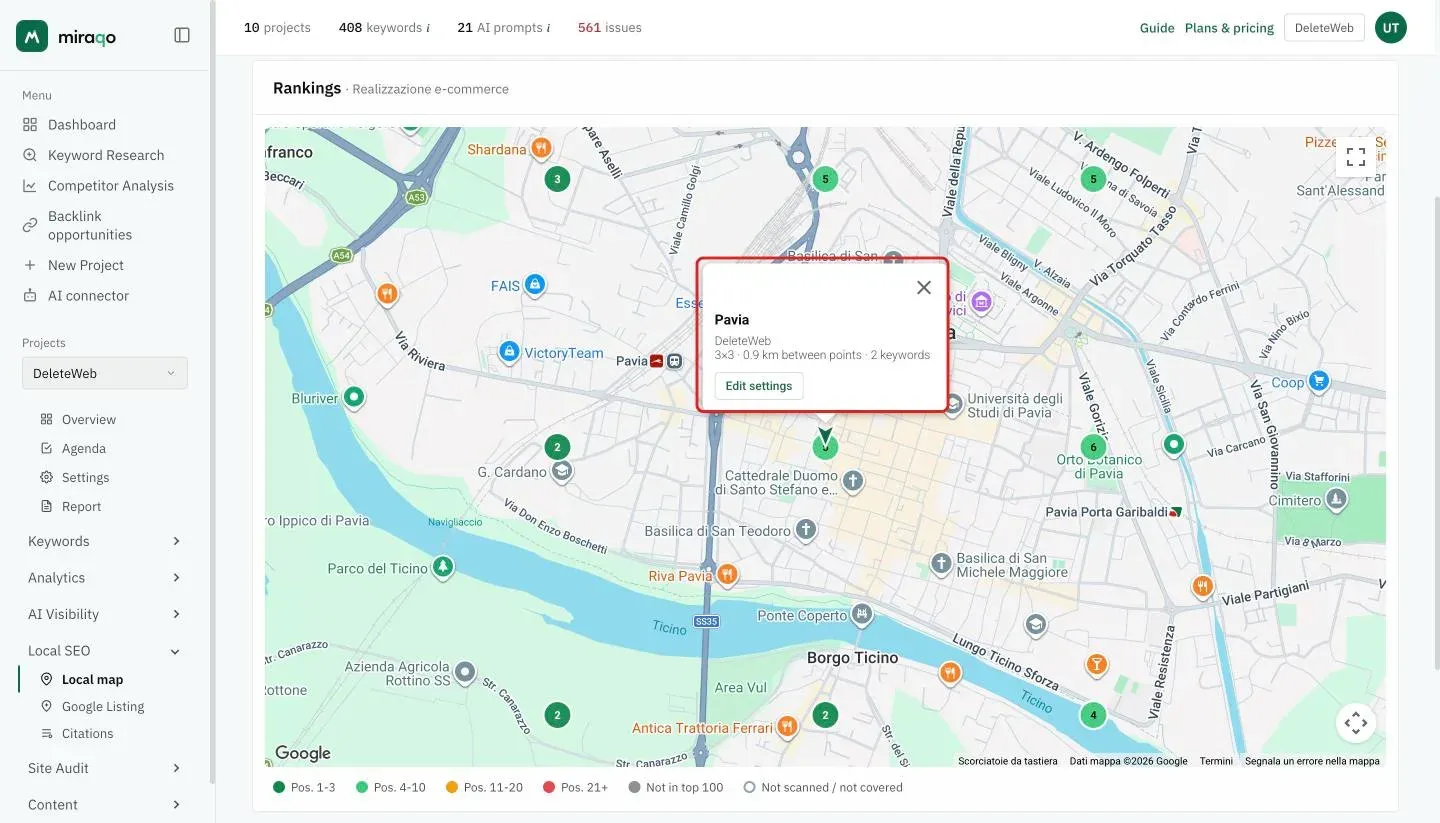
- Central arrow marker for each location (click it to see name, business, grid size, number of keywords and a “Edit settings” link)
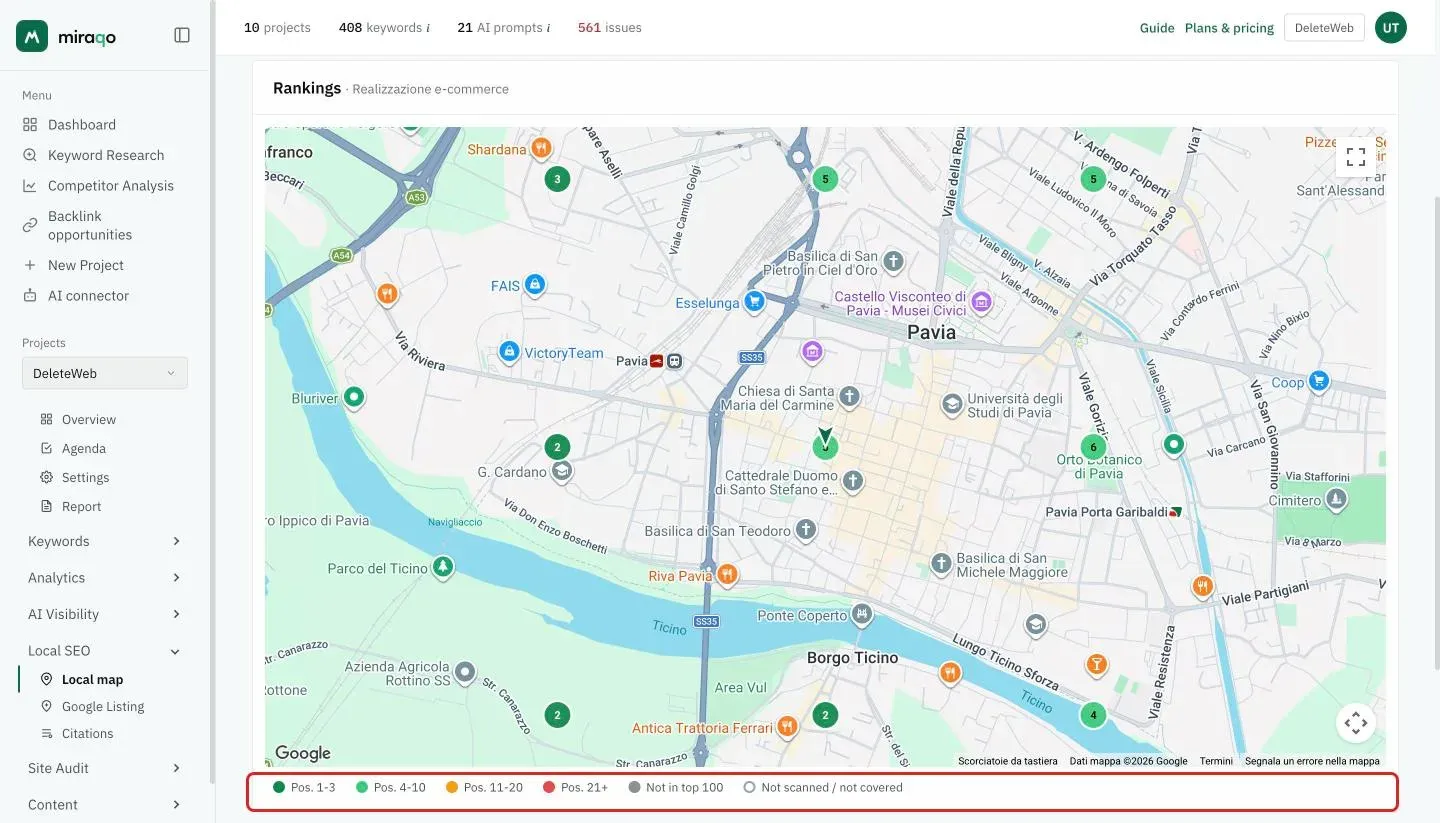
- Coloured circle for each grid point, with the position number reached at that point inside:
| Colour | Meaning |
|---|---|
| 🟢 Dark green | Position 1–3 |
| 🟢 Lime green | Position 4–10 |
| 🟠 Orange | Position 11–20 |
| 🔴 Red | Position 21+ |
| ⚫ Solid grey | Point scanned, but your business doesn’t show up |
| ⚪ Empty white | Point not scanned (or location not tracking this keyword) |
At a glance you understand where you’re geographically strong and where you’re losing visibility.
Historical trend table
Below the map (once there are at least two scan rounds), the Historical trend table shows how the selected keyword evolves over time: one column per round (last 12), and for each location the coverage — in how many grid points you show up out of the total, e.g. 6/9 — with the average position underneath. Colours follow the map legend. It’s the fastest way to answer “are we improving or slipping?” without comparing screenshots.
Grey doesn’t mean “you’re 101st”. On Google Maps the result list for a point is short — often around twenty businesses in total, not a hundred. Either you fall inside that point’s relevance radius and rank high, or you’re not there at all. A grey point means “Google doesn’t surface you there”, not “it surfaces you way down”: the lever is proximity and the strength of your listing, not climbing positions.
Project Google Listing
At the bottom of the page, a row that leads to the project’s Google Listing: if it’s already connected it shows name, ★ rating and number of reviews with the Open link; otherwise it offers to connect it. Reviews and replies are managed on the Google Listing page, not here.
Editing a location
Clicking the central marker of a location → Edit settings. The edit page opens where you can:
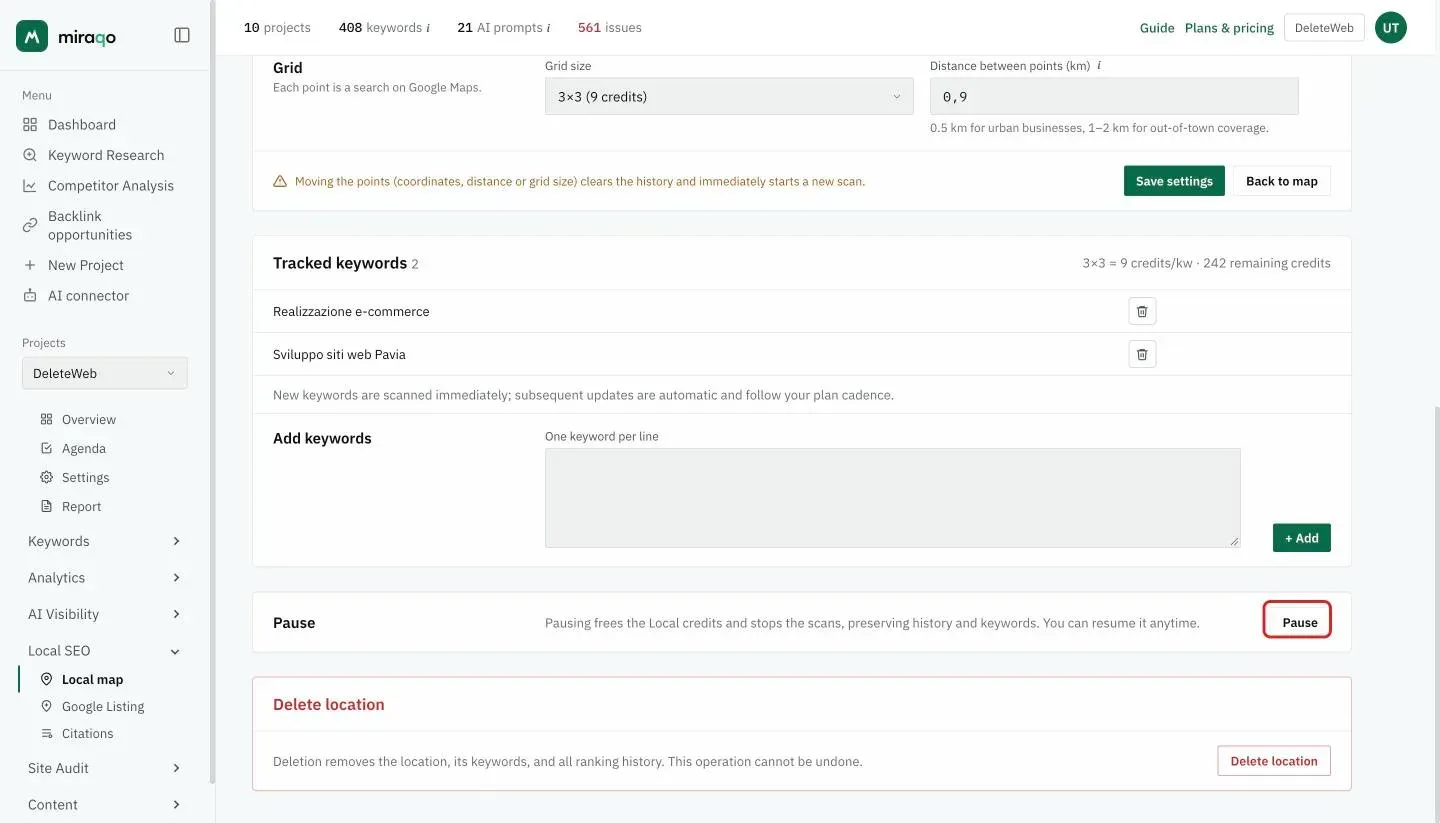
- Change name, business name, position, grid size, distance between points
- Add keywords (one per line, + Add) or remove them with the bin — new keywords are scanned immediately
- See the credit cost per keyword for the current grid and remaining credits
- Pause the location (see below)
- Delete the location from the red box at the bottom (removes grid, keywords and history)
Moving the grid starts from scratch. If you change the position, the distance between points or the grid size, the history is cleared and a new scan starts immediately: the old data was measured on different points of the map, and keeping it on the new setup would tell a false story. Changing only the name (or the business name) doesn’t touch the history.
Pausing a location
From the edit page, the Pause button suspends the location: it stops being scanned and frees its Local credits, but history and keywords are kept. It’s the right alternative to deletion when a location needs a temporary break — a seasonal client, a shop being renovated — without losing the data collected.
Paused locations stay listed at the bottom of the Local map page, with Manage and Resume buttons. On resume the credits are re-checked: if the budget has filled up in the meantime, resuming is blocked until you free credits. A resumed location joins the next weekly round.
When data is updated
- Initial scan — as soon as you create a location with keywords (or add new keywords to an existing location), Miraqo performs an immediate first scan: you don’t need to wait to see the first data on the map.
- Rescan every 7 days — after that, each active grid updates itself once a week, on every plan. Unlike SERP keywords, Local doesn’t follow the plan’s frequency (every 3 days or daily): Maps positions move slowly, and scanning daily would burn the budget without telling you anything new.
- No manual scan button — the first scan plus the weekly round cover every need. It’s also why Local credits are counted once, on your active setup, and not per scan.
If you change the grid size or move the centre, the history is cleared and the new setup is scanned immediately (see “Editing a location”). New keywords start immediately too.
Emails when coverage changes
If you have Ranking drops or Improvements enabled in the project notifications, you get an email when the number of points where you show up on Maps changes — coverage, not the individual position.
- It only fires when the gap is at least 2 points (or 10% of the grid’s points, if it’s bigger): a point flickering in and out from one week to the next won’t fill your inbox.
- With coverage unchanged, the email still fires if the average position shifts by at least 3 positions: you show up on the same points, but much higher (or lower) than before.
- One email per project, listing the locations and keywords that moved, how many points before/after and the average position.
- It compares the last two complete rounds. A partial round (scan still running) is skipped rather than producing a false comparison.
This is the alert that tells you what actually matters in Local: not “I went from 3rd to 4th”, but “since Monday I’ve disappeared from half the neighbourhood”.
Limits by plan
| Plan | Local credits included | Max grid |
|---|---|---|
| Solo | — (add-on only) | 3×3 |
| Starter | — (add-on only) | 3×3 |
| Pro | 260 | 5×5 |
| Agency | 260 | 7×7 |
How to use 260 credits. Examples: 10 keywords × 5×5 = 250 (classic Pro); 5 keywords × 7×7 = 245 (Agency with max grid); 2 locations × 5 keywords × 5×5 = 250 (Agency multi-location). You can mix different grids until you saturate the budget.
Add-on: extra Local SEO credits
500 credits at €15/month (€150/year, 2 months free), stackable and cancellable any time from Account settings → Subscription.
It does two different things depending on the plan:
- On Pro and Agency it adds to the 260 included credits: 760 in total with one unit, 1,260 with two. Mostly useful if you run many locations — for an agency with dozens of local projects the base 260 go quickly.
- On Solo and Starter the add-on is what turns the feature on, since it isn’t included otherwise. 3×3 grid, so 500 credits is roughly 55 monitored keywords (or fewer keywords spread across several locations).
Maximum grid size still comes from the plan: the add-on adds budget, it doesn’t unlock 5×5 or 7×7.
If you cancel the add-on and stay over budget, grids stop updating until you’re back within it (by removing keywords or shrinking grids). Historical data stays.
Multi-location and franchises
On Pro and Agency plans you can distribute the credit budget across multiple locations within the same project: each has its own grid, size and keywords. The local ranking map unifies the grids in the same view, and the keyword selector lets you compare at a glance where each location is strong on the same query.
For franchises with dozens of locations or custom configurations, contact support.
See also:
- Google Listing → for reviews and AI-assisted replies
- Project keywords → for standard SERP rank tracking
Last updated: 18 October 2026